本帖最后由 种过一豆 于 2011-6-9 10:49 编辑
VirtualBox P2V Physical to Virtual in VirtualBox January 18, 2010 By Dinesh
This article explains how you can do VirtualBox P2V convert physical machine to virtual machine in Sun VirtualBox. It’s not straight forward method since there no tools available for VirtualBox P2V Physical to Virtual conversion. But still it’s possible with free VMware tool.
Before start the procedures, let me tell you how it’s going to work.

We will use a free VMware converter tool to convert physical to virtual machine which will create VMX and VMDK files according to physical computer and disks configuration.
Then import the created VMDK file to VirtualBox as hard disk, create a virtual machine and boot from VMDK file hard disk. That’s it. It will work fine.
Don’t waste your time to search a tool VirtualBox P2V convert Physical to Virtual in VirtualBox directl, its not available till today if I’m not wrong. If you are a VirtualBox fan and you want to try P2V and run in Sun VirtualBox, then this is the only VirtualBox P2V option available.
Physical to Virtual in VirtualBox – VirtualBox P2V – Step by step methods
1) Download VMware Converter here
2) Convert your physical computer to virtual using free VMware vCentre converter as mentioned here. Make sure you select correct physical partitions, processors and memory size for new virtual machine. Don’t split the virtual disks during the conversion.
3) Once successfully created, locate the VMX and VMDK files. Don’t bother about VMX files.
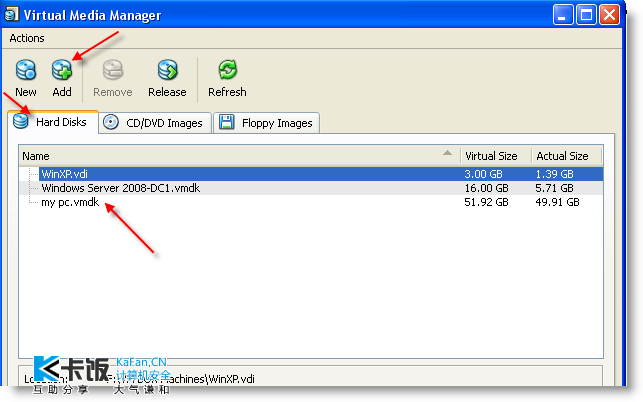
4) Now add the newly created vmdk file to VirtualBox media manager as shown below.

5) Read more about adding and accessing vmdk disk files in sun VirtualBox here. This article explains how you can access vmdk disk file as partition in side virtual machine in sun VirtualBox. We don’t require that much now. Just to know how to add vmdk file to sun VirtualBox media manger.
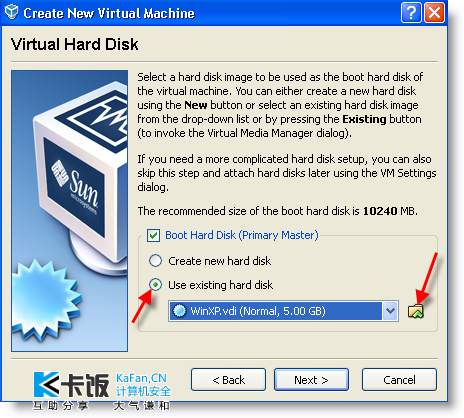
6) After successfully added vmdk disk file, create a new virtual machine in VirtualBox. Select the correct guest OS, processor type and memory size. In virtual hard disk box select ‘Use existing Hard Disk’ and browse the disk you added by vmdk file in VirtualBox media manager. So your new virtual machine will boot from vmdk disk which we converted from physical to virtual.

7) That’s it. Boot the virtual machine now. It will be booting and working fine. Sometimes it may install additional required drivers on sun virtual machine. Let it complete and install the Sun guest additions to get better display performance with additional features.
8) You must see your physical computer on Sun VirtualBox as virtual machine now. This is the easiest method to convert Physical to Virtual in VirtualBox – VirtualBox P2V with free tool.
9) If you are still interested in running pure sun VirtualBox machine with VDI files, you can convert your newly created VMDK files to VDI format with free tool as mentioned here. After created vdi file add it to media manager and boot virtual machine from vdi files.
====================================================================================
How to migrate existing Windows installations to VirtualBox
Windows installations, unlike Linux, cannot easily be moved from one hardware to another. This is not just due to Microsoft's activation mechanism but the fact that the installed kernel and drivers depend on the actual hardware.
This document explains the common pitfalls and how to workaround these. We assume that either a physical Windows installation or a VMware image is the source of migration. It is also assumed that a suitable virtual disk image (either VDI or VMDK for VirtualBox >= 1.4) is already present.
There's a step by step description below.
HAL
The hardware dependent portion of the Windows kernel is dubbed "Hardware Abstraction Layer" (HAL). While hardware vendor specific HALs have become very rare, there are still a number of HALs shipped by Microsoft. Here are the most common HALs (for more information, refer to this article: http://support.microsoft.com/kb/309283):
Hal.dll (Standard PC)
Halacpi.dll (ACPI HAL)
Halaacpi.dll (ACPI HAL with IO APIC)
If you perform a Windows installation with default settings in VirtualBox, Halacpi.dll will be chosen as VirtualBox enables ACPI by default but disables the IO APIC by default. A standard installation on a modern physical PC or VMware will usually result in Halaacpi.dll being chosen as most systems nowadays have an IO APIC and VMware chose to virtualize it by default (VirtualBox disables the IO APIC because it is more expensive to virtualize than a standard PIC). So as a first step, you either have to enable IO APIC support in VirtualBox or replace the HAL. Replacing the HAL can be done by booting the VM from the Windows CD and performing a repair installation.
Hard Disk Support
For reasons we don't understand, Windows memorizes which IDE/ATA controller it was installed on and fails to boot in case the controller changes. This is very annoying because you will run into this problem with basically all migrated images. The solution here is to perform several modifications to the Windows registry. This can be done while the installation is still running on the original system because all it does is relax the IDE checks. Therefore the installation will continue to work on the original system after the modification. The easiest way is to use the excellent MergeIDE utility from the German c't computer magazine. Alternatively, instructions in Microsoft's knowledge base article can be followed: http://support.microsoft.com/kb/314082
agp440.sys / intelppm.sys
There are a few Windows device drivers that does not play nice on VirtualBox' hardware. Many physical PC systems (and VMware) have a AGP graphics bus which will cause agp440.sys to be installed. VirtualBox' virtual graphics card is on the PCI bus and the driver will cause a system crash. The most correct approach is to boot the recovery console from the Windows installation CD and disable this service. However, it is also possible to just rename/delete agp440.sys the C:\Windows\SYSTEM32\drivers directory. Here is a knowledge base article containing more information: http://support.microsoft.com/kb/324764
A similar problem may exist with intelppm.sys, which can also cause a hang of the guest OS.
Step By Step Instructions For Windows XP
This should work for Win2k Vista and Windows 7 as well, but it's untested.
1.Run the MergeIDE utility as mentioned above on existing windows machine.
2.Shut down windows machine.
3.Either pull the drive from the windows machine or copy the data with a low level image tool (like dd) to a USB drive or other removable media. If making an image, DO NOT image just the partition, this will not work!
4.Use VBoxMange convertfromfaw to convert the image or to copy from the drive you pulled from the windows machine.
a.If you are converting from the image, the syntax is just
VBoxManage convertfromraw ImageFile.dd OutputFile.vdi
b.If you are converting from the drive, you need to use
cat /dev/sdg | VBoxManage convertfromraw stdin OutPutFile.vdi NUMBEROFBYTES
Note, if you use fdisk -l in Linux you can see how many bytes each drive is to supply this parameter. Example:
# fdisk -l /dev/sda
Disk /dev/sda: 1500.3 GB, 1500301910016 bytes
To determine the same information on a Mac OS X host, you do
# diskutil list
# diskutil info /dev/disk0
to list available disks and to show the number of bytes under Total Size:.
5.Then use the media manager in VirtualBox to add the newly converted drive.
6.Make a new virtual machine, using the drive you just added with the media manager.
7.Once it is created, go in and turn on “Enable IO APIC”, select the # of processors you want etc.
8.Try to boot the new virtual machine. It may “just work”, or you may get a BSOD. If it just works install guest additions and you are done. Depending on your license you might need to re-activate Windows.
9.If it did not work, and you got a BSOD. Shutdown the virtual machine and boot up from a windows CD. Go through until you get to the select a partition, select the existing partition, and choose “repair”. It will basically reinstall windows and configure it for your new hardware (virtual hardware).
10.Reinstall patches (Service packs) and updates.
11.Install guest additions
------------------------------------------------------------------------------
本来想等有人上个vmware的P2V教程之后补充下利用vmware converter 在vbox也实现P2V的,迟迟不见有人上,就先贴出来好了
只说一下上面那段步骤,不逐一解释(一个个单词翻译没什么意思)
virtualbox自身没有带P2V转换的实现工具,不过可以利用vmware的,转换出来的格式再套进virtualbox的虚拟磁盘里面去
1 下载vmware converter转换工具(之前了解的印象是有分普通版本跟企业版本,普通版本只能实现hot cloning ,企业版本的可以实现 cold cloning ,现在具体的情况不知道,好久没用vmware了)
2 打开vmware converter 软件,在选择硬件设备的时候注意选对自己系统所在的分区 ,CPU,以及转换后虚拟系统的内存大小,具体的教程自己搜罗一下吧,不是很难
3 转换成功后这一步好像我没找到
4 新建虚拟机导入刚才转换好的虚拟磁盘文件
................
后面那个官方的how to 还是不要轻易去尝试,怕不懂的人不小心用dd之类的命令把物理硬盘给咔嚓了
真懒了,不想翻译了,有需要的让英语帝来翻译一下 ,改成讨论吧(其实======前面那部分就是一个教程,不过是英文的,后面的是virtualbox的官方how to 没有测试过,自己上吧,小心就好),有谁翻译出来的直接再开帖做出来就好了 ,改成讨论吧(其实======前面那部分就是一个教程,不过是英文的,后面的是virtualbox的官方how to 没有测试过,自己上吧,小心就好),有谁翻译出来的直接再开帖做出来就好了 |
 [复制链接]