本帖最后由 种过一豆 于 2011-11-27 13:18 编辑
这里讲一点VirtualBox的网络使用问题
Network Address Translation (NAT) is the simplest way of accessing an external network from a virtual machine. Usually, it does not require any configuration on the host network and guest system. For this reason, it is the default networking mode in VirtualBox.
A virtual machine with NAT enabled acts much like a real computer that connects to the Internet through a router. The "router", in this case, is the VirtualBox networking engine, which maps traffic from and to the virtual machine transparently. The disadvantage of NAT mode is that, much like a private network behind a router, the virtual machine is invisible and unreachable from the outside internet; you cannot run a server this way unless you set up port forwarding
Security Features --- Networking
The default networking mode for VMs is NAT which means that the VM acts like a computer behind a router, see the section called “Network Address Translation (NAT)”. The guest is part of a private subnet belonging to this VM and the guest IP is not visible from the outside. This networking mode works without any additional setup and is sufficient for many purposes.
If bridged networking is used, the VM acts like a computer inside the same network as the host, see the section called “Bridged networking”. In this case, the guest has the same network access as the host and a firewall might be necessary to protect other computers on the subnet from a potential malicious guest as well as to protect the guest from a direct access from other computers. In some cases it is worth considering using a forwarding rule for a specific port in NAT mode instead of using bridged networking.
Some setups do not require a VM to be connected to the public network at all. Internal networking (see the section called “Internal networking”) or host-only networking (see the section called “Host-only networking”) are often sufficient to connect VMs among each other or to connect VMs only with the host but not with the public network.
上面这段手册里面说的大概内容就是nat联网方式是VirtualBox虚拟机默认的,nat方式联网guest处于私有网络中,也是比较安全的一种联网方式,在nat联网方式下外部机器无法直接访问guest;
实现端口映射可以用vboxmanage命令,官方手册上的说明如下,当然了,能不用command就不用,这样太麻烦了,下面会简单说一下如何在GUI界面操作映射:
You will need to know which ports on the guest the service uses and to decide which ports to use on the host (often but not always you will want to use the same ports on the guest and on the host). You can use any ports on the host which are not already in use by a service. For example, to set up incoming NAT connections to an ssh server in the guest, use the following command:
VBoxManage modifyvm "VM name" --natpf1 "guestssh,tcp,,2222,,22"
With the above example, all TCP traffic arriving on port 2222 on any host interface will be forwarded to port 22 in the guest. The protocol name tcp is a mandatory attribute defining which protocol should be used for forwarding (udp could also be used). The name guestssh is purely descriptive and will be auto-generated if omitted. The number after --natpf denotes the network card, like in other parts of VBoxManage.
To remove this forwarding rule again, use the following command:
VBoxManage modifyvm "VM name" --natpf1 delete "guestssh"
If for some reason the guest uses a static assigned IP address not leased from the built-in DHCP server, it is required to specify the guest IP when registering the forwarding rule:
VBoxManage modifyvm "VM name" --natpf1 "guestssh,tcp,,2222,10.0.2.19,22"
This example is identical to the previous one, except that the NAT engine is being told that the guest can be found at the 10.0.2.19 address.
To forward all incoming traffic from a specific host interface to the guest, specify the IP of that host interface like this:
VBoxManage modifyvm "VM name" --natpf1 "guestssh,tcp,127.0.0.1,2222,,22"
This forwards all TCP traffic arriving on the localhost interface (127.0.0.1) via port 2222 to port 22 in the guest.
[注解]:一般来说nat方式联网是最适用的,不管是adsl拨号还是通过路由器的网络环境联网,在主机能够联网的情况下通过nat方式虚拟机都可以联网
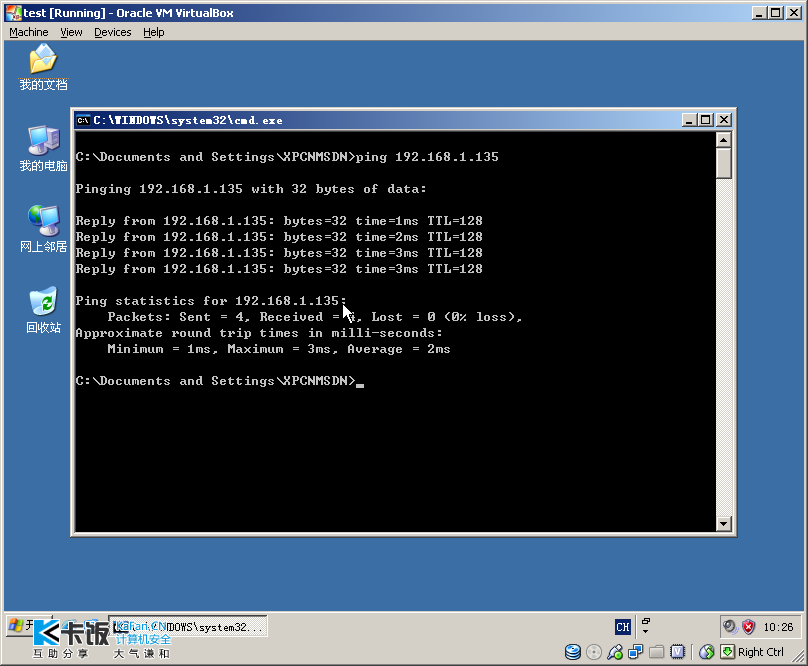
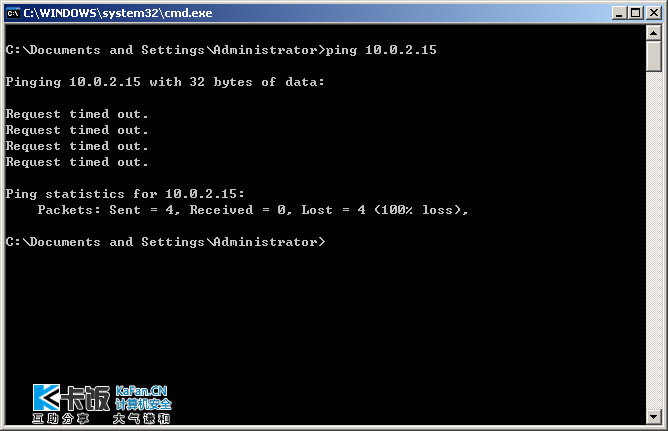
NAT方式下虚拟机ping主机可以ping通,反过来是不行的(换句话说虚拟机可以访问主机,而主机没有办法直接访问虚拟机)
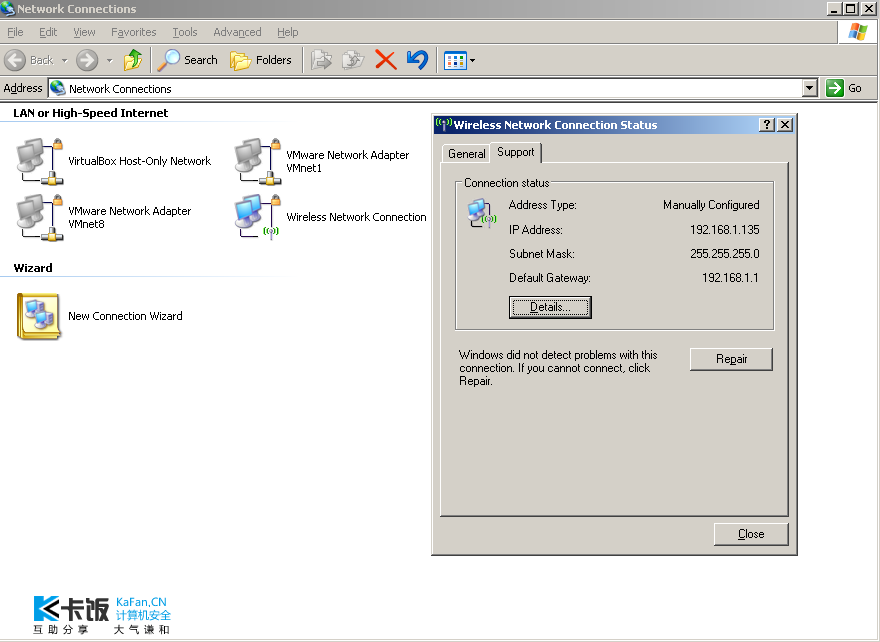
虚拟机nat下ping主机192.168.1.135 ------- 主机ip地址可以通过ipconfig /all 命令查看,也可以通过双击网络连接在图形界面上看到:
主机ip地址查看 -------- 192.168.1.135
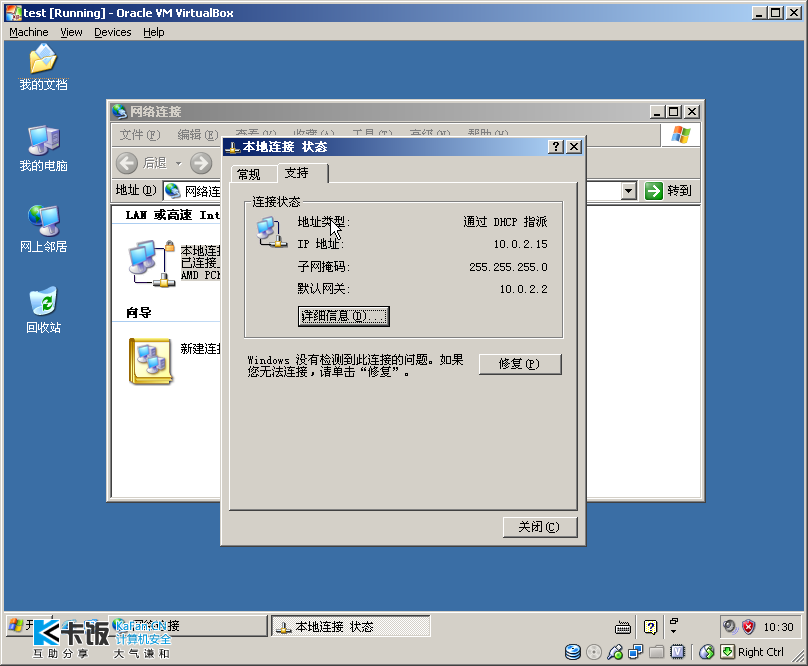
虚拟机ip地址查看 -------- 10.0.2.15
虚拟机ping主机 ---- 通
主机ping虚拟机 --- 不通
如果在虚拟机里面架设了一个服务器(这里我拿ftp服务器的例子来讲解),直接访问是不行的,不过可以通过端口映射功能实现在nat方式下主机访问虚拟机的ftp服务(不用命令了,直接图形界面操作吧)
----------------------- ServU服务器例子--------------------
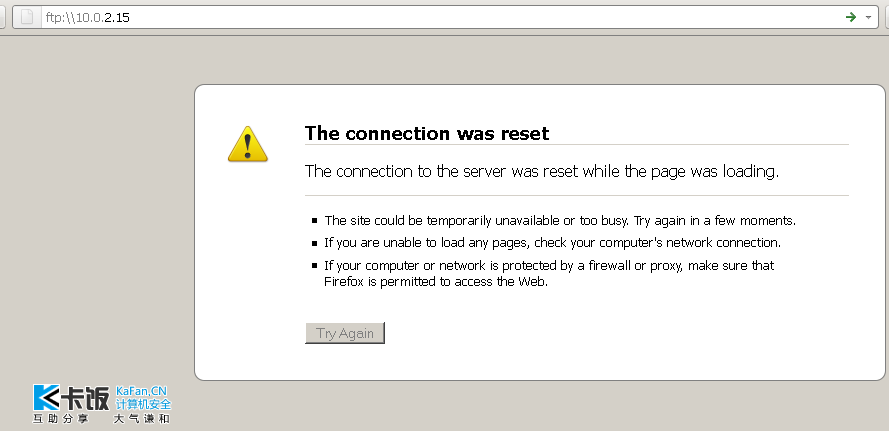
架设好相关服务后,直接在主机浏览器或者相对应服务器的客户端访问虚拟机服务访问不了(这里我拿浏览器直接访问虚拟机ftp服务器)
无法访问
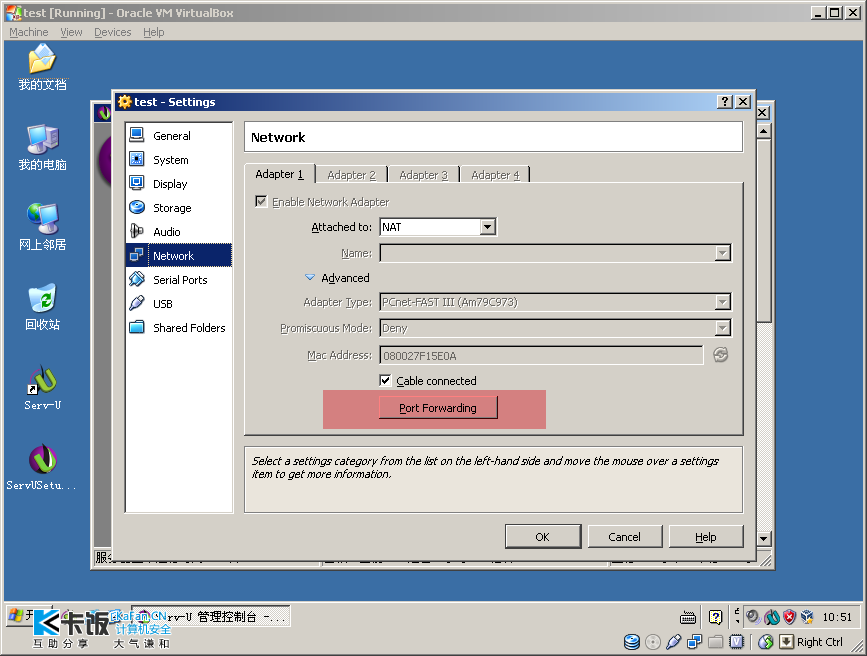
打开虚拟机nat网卡设置 Port Forwarding ,添加端口映射,把虚拟机的相对应服务器端口映射出来
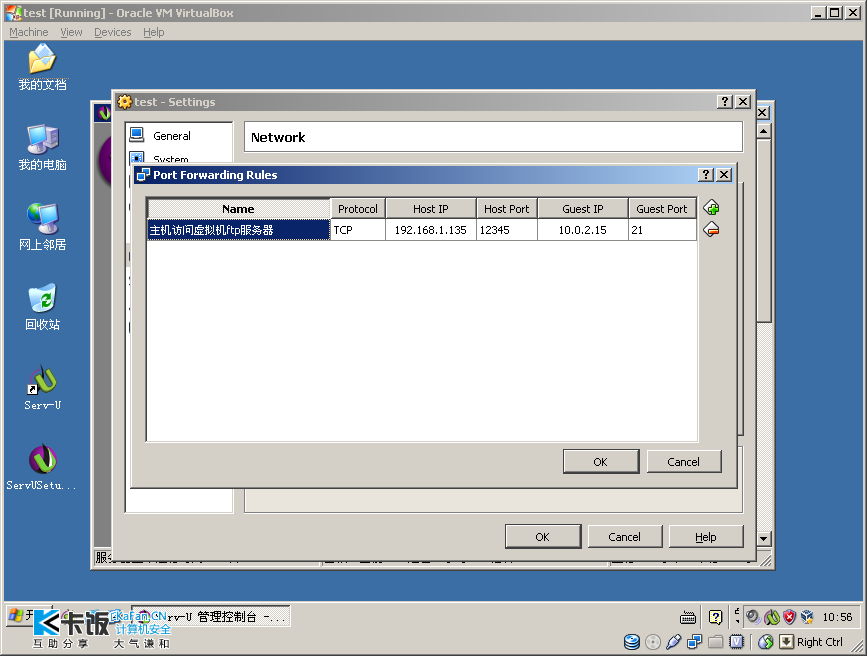
比如添加一条:
主机访问虚拟机ftp服务器的映射 协议选ftp, hostip填物理机器上的ip, hostport选一个1024以后未被占用的端口(不要超过65535)比如12345,guestip填虚拟机ip地址,guestport填对应服务器用到的端口比如ftp--21
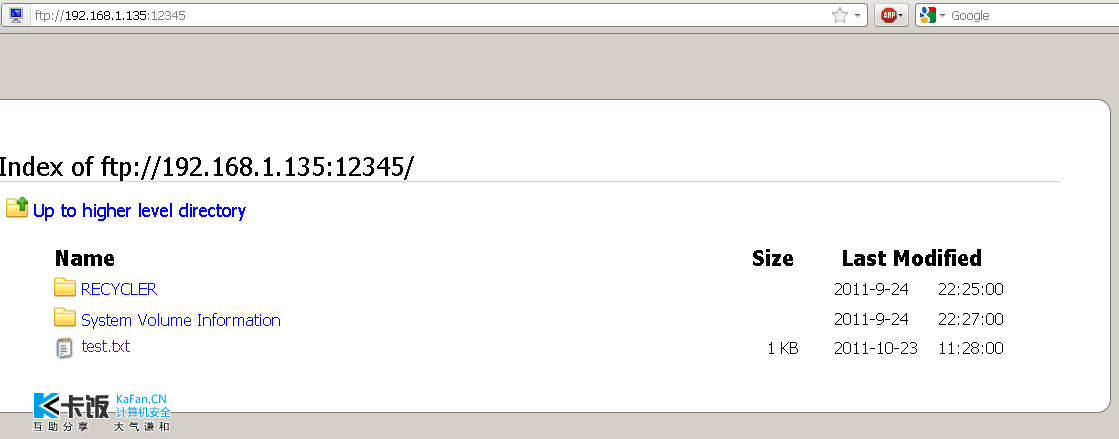
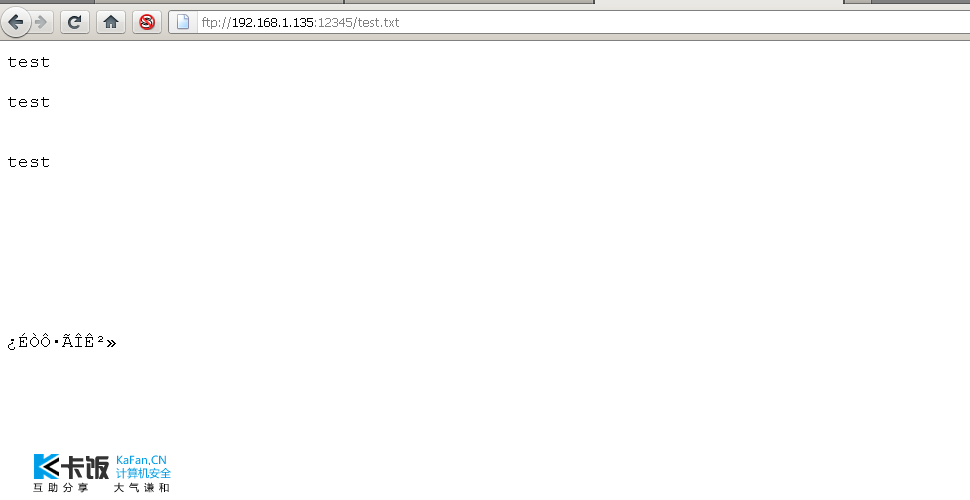
添加完成后访问虚拟机服务器只需要通过 ftp:\\192.168.1.135:12345 即可
输入用户名密码

ok,可以看到内容
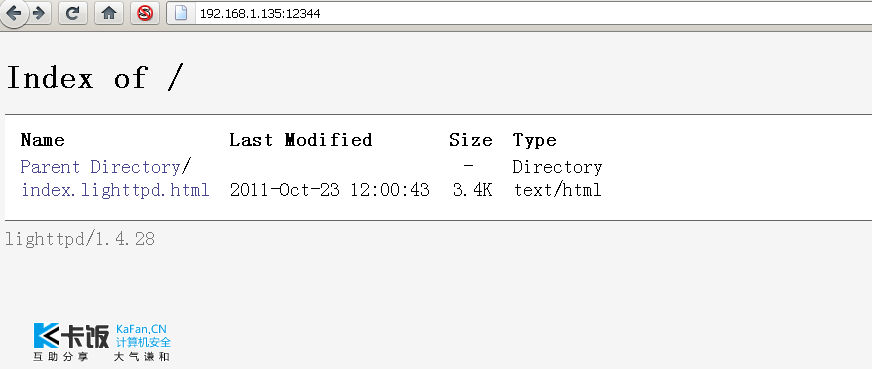
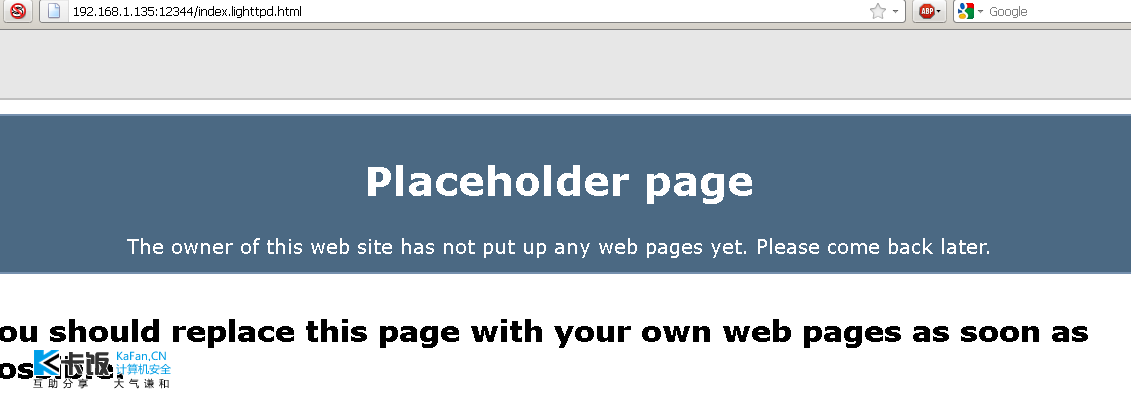
http服务器也是可以通过类似的方法添加端口映射访问的:
================
Host-only networking
Host-only networking is another networking mode that was added with version 2.2 of VirtualBox. It can be thought of as a hybrid between the bridged and internal networking modes: as with bridged networking, the virtual machines can talk to each other and the host as if they were connected through a physical ethernet switch. Similarly, as with internal networking however, a physical networking interface need not be present, and the virtual machines cannot talk to the world outside the host since they are not connected to a physical networking interface.
Instead, when host-only networking is used, VirtualBox creates a new software interface on the host which then appears next to your existing network interfaces. In other words, whereas with bridged networking an existing physical interface is used to attach virtual machines to, with host-only networking a new "loopback" interface is created on the host. And whereas with internal networking, the traffic between the virtual machines cannot be seen, the traffic on the "loopback" interface on the host can be intercepted.
Host-only networking is particularly useful for preconfigured virtual appliances, where multiple virtual machines are shipped together and designed to cooperate. For example, one virtual machine may contain a web server and a second one a database, and since they are intended to talk to each other, the appliance can instruct VirtualBox to set up a host-only network for the two. A second (bridged) network would then connect the web server to the outside world to serve data to, but the outside world cannot connect to the database.
nat下想让host跟guest互通还可以通过添加host-only来实现...
host-only类似于vmware下面网络设置的vmnet1/vmnet8虚拟交换机,主机跟虚拟机通过host-only连接在同一个子网内(许多人觉得这个host-only没有什么意义,其实这个host-only是很方便的,在虚拟机使用nat方式联网的时候,主机可以通过host-only方便地访问虚拟机内的资源,看起来这个方式比nat下的端口映射要麻烦一些,其实用起来会感觉到这种方式会更方便)
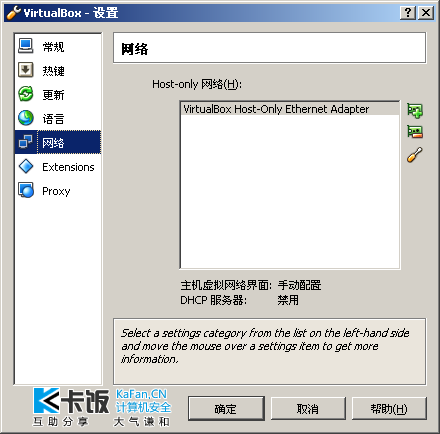
在用host-only之前,需要到VirtualBox全局设置里面检查一下有没有添加好host-only网络
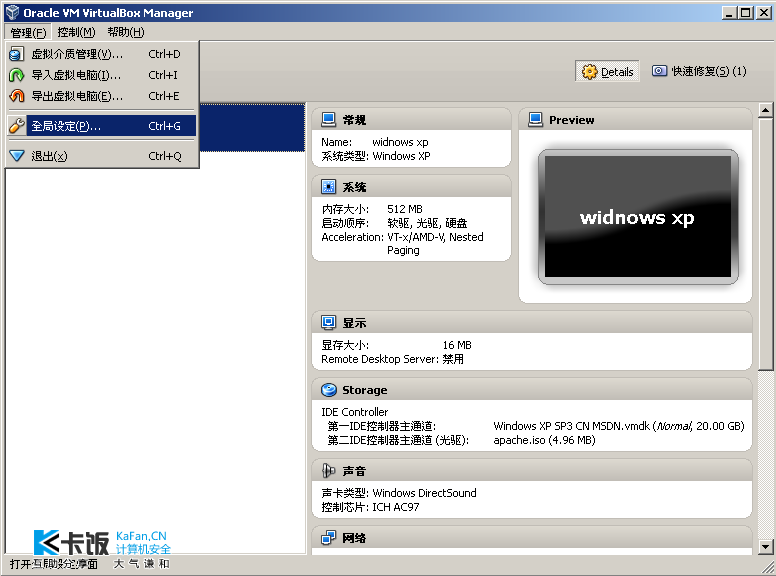
如果看到下图所示那么就可以,如果没有看到点击那个带 加号 的按钮添加一个,第三个螺丝刀一样图标的是用来配置的,有兴趣可以点进去看一些详细的ip地址池情况,可以自己设置喜欢的私有地址
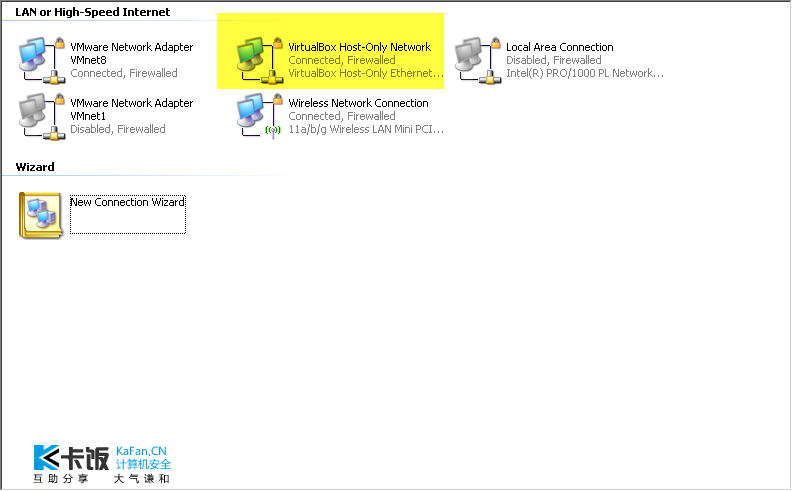
还需要检查主机网络连接里面的host-only有没有开启(当然平时一般是用不到这个东西的,不需要的时候可以禁用掉host-only,不过开着也不碍事)
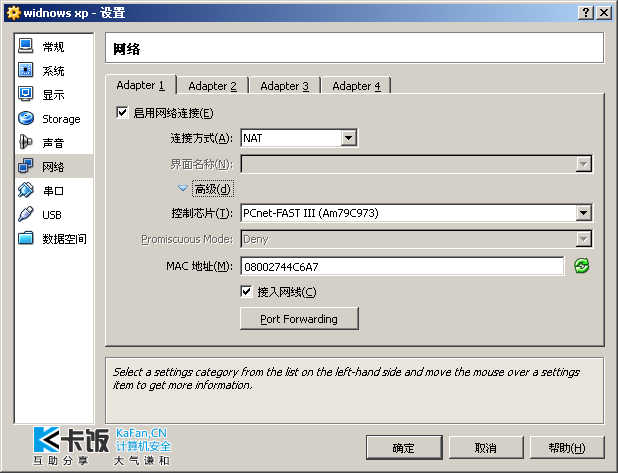
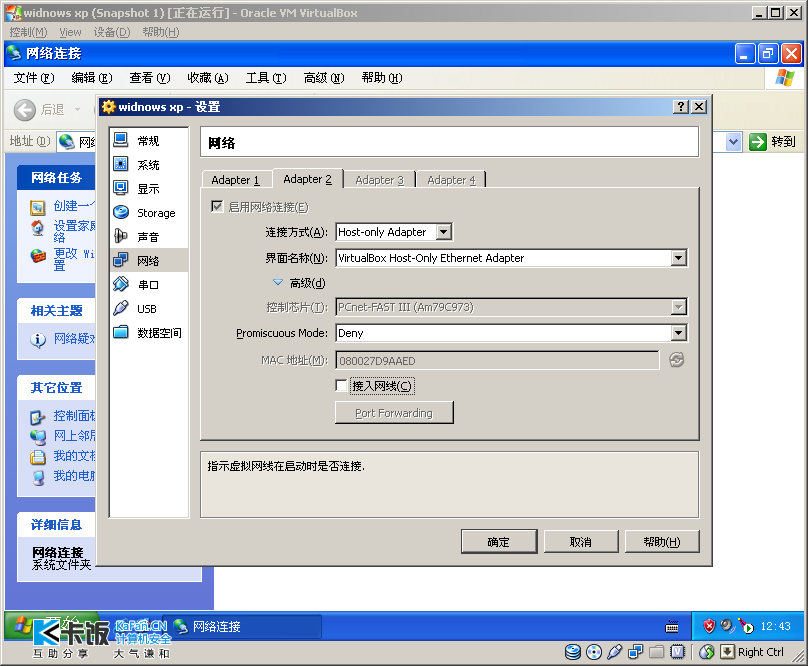
检查完毕后到相应虚拟机里面设置网卡(一块默认为nat方式联网,一块设置host-only方式跟主机互连)

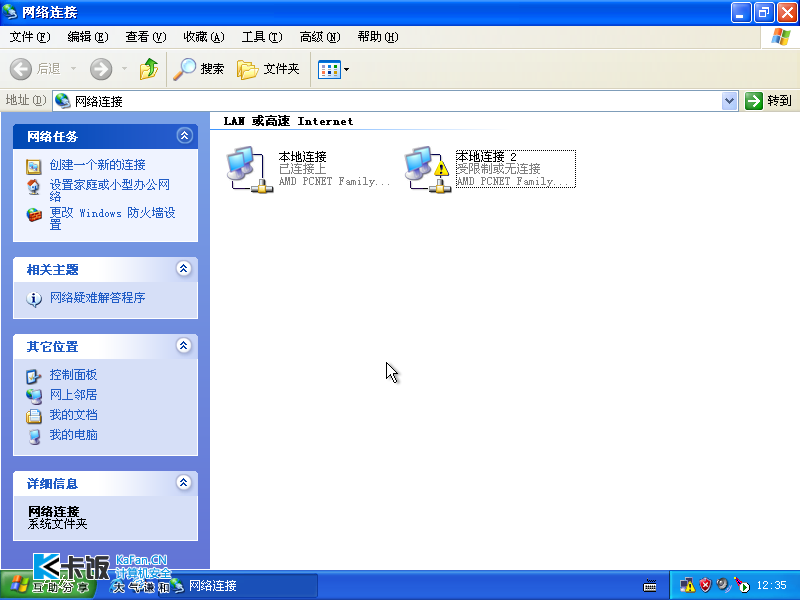
启动虚拟机后会发现多了一块网卡,但是却没有分配到ip地址(有个感叹号的那个就是没有成功分配ip地址的)
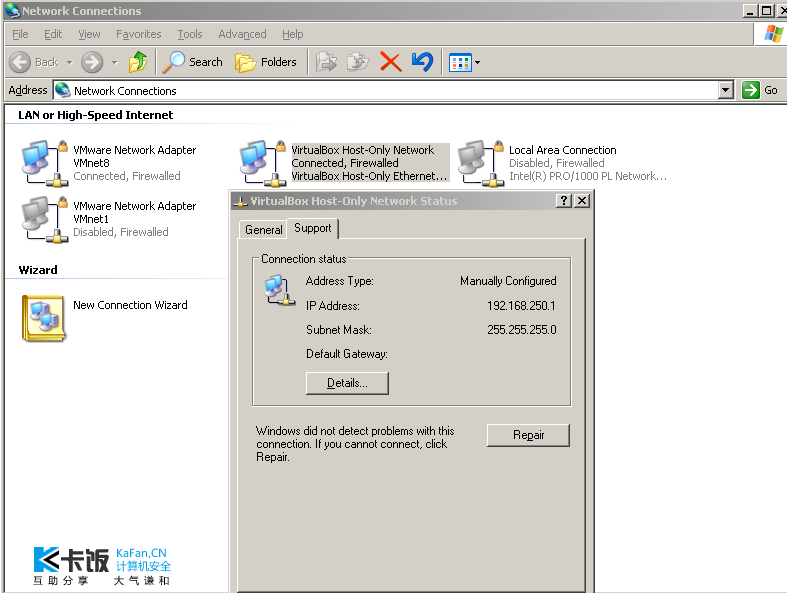
点开主机host-only的图标,然后找到详细信息,可以看到默认的是192.168.250.0网断,子网掩码默认为c类ip地址的255.255.255.0
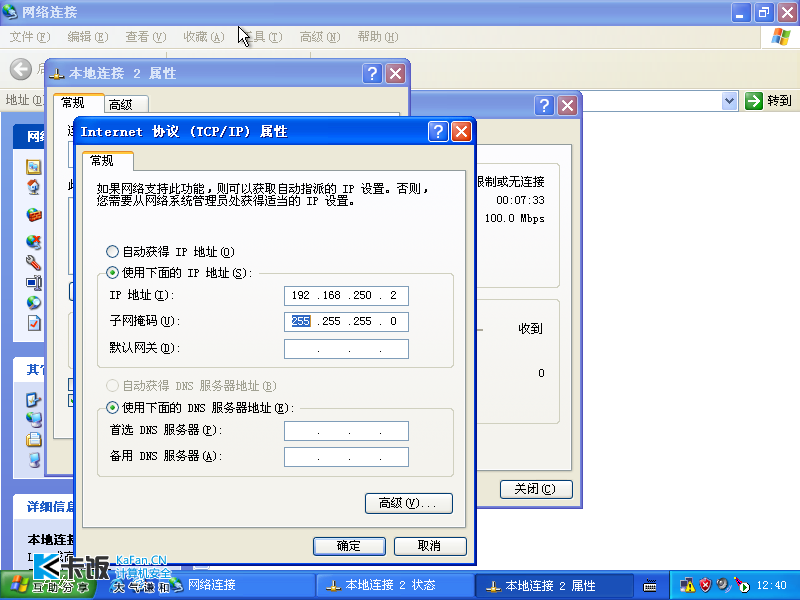
我们手动给虚拟机的网络连接2分配一个ip地址比如192.168.250.2,子网掩码跟主机那边看到的一样255.255.255.0,其他的不用填写
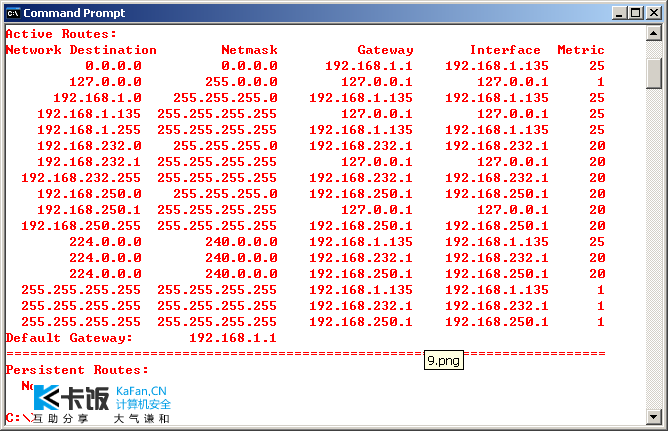
查找路由表可以看到主机里面192.168.250.0网段的数据转交给了192.168.250.1,再转发到虚拟机内部
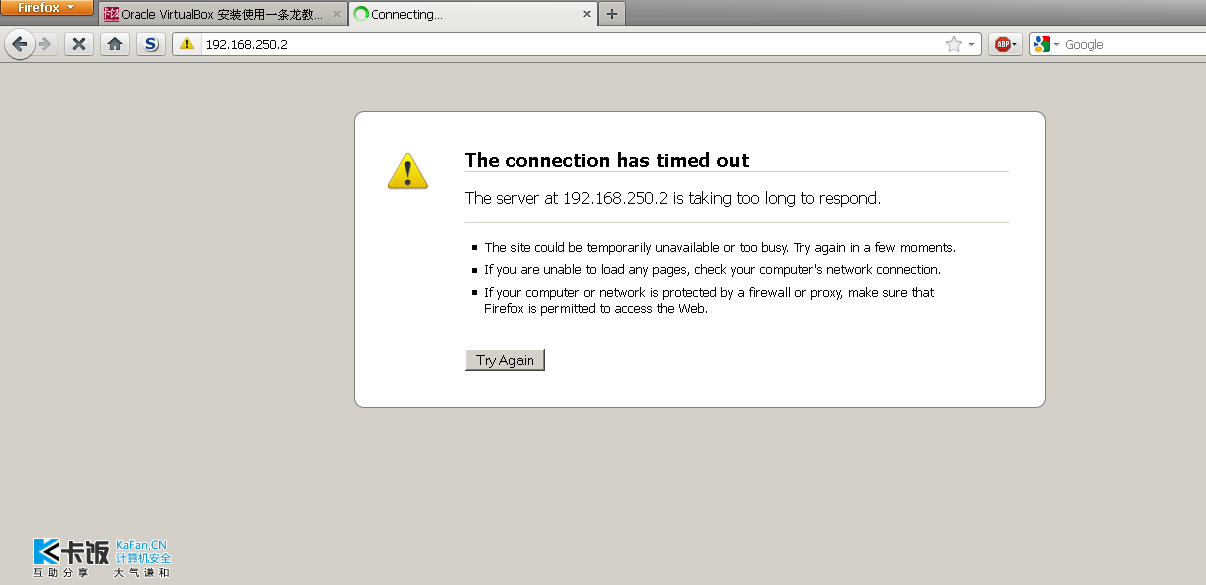
这里以一个web服务器来做试验,设置完上面的步骤以后,我们在主机访问虚拟机web服务
打开浏览器,在里面输入刚才为虚拟机网络连接2指定的ip地址192.168.250.2
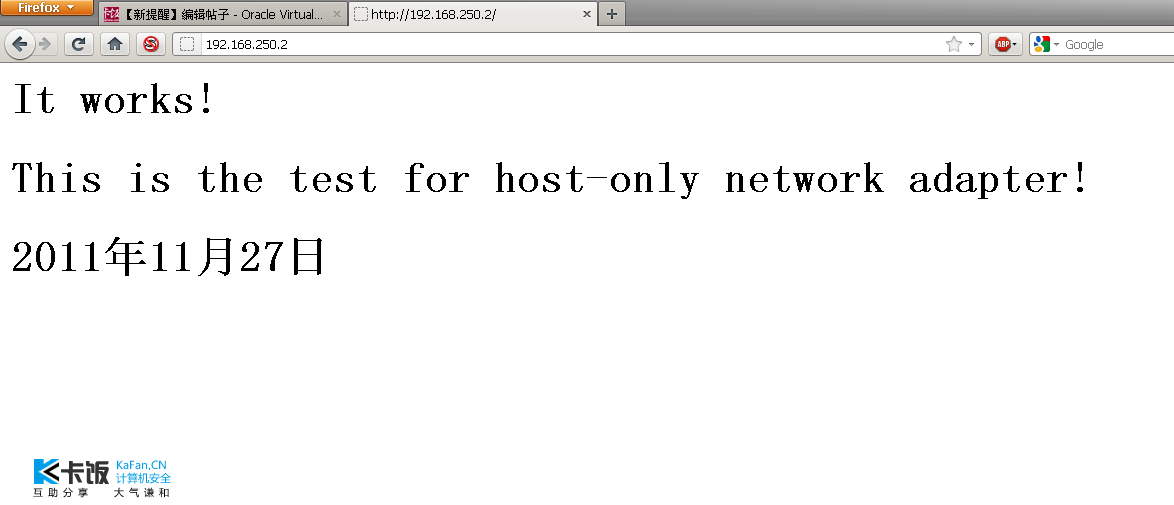
已经可以顺利地访问到虚拟机的相关服务了
如果此时断开host-only网卡的电源就不能访问web服务器,说明我们刚才的设置确实是为主机访问虚拟机相关服务提供了极大的便利(不需要切换到bridge方式下,毕竟bridge方式联网直接把虚拟机暴露给了局域网)
-------------------------------------------------
Bdidge 方式联网---- 还需要解释么,就把guest当做局域网内另外一台独立的主机看待就好,让其自动获取或者是填上跟主机同一个网段内可用的ip地址即可,当然如果主机是直接连adsl/modem方式上网的话bridge方式联网就不一定能够行得通了......
另外adsl方式下如果想实现主机跟物理机同时拨号的也是采用桥接联网的方式,不过前提是当地的ISP允许单帐户多拨号
......
|
 [复制链接]